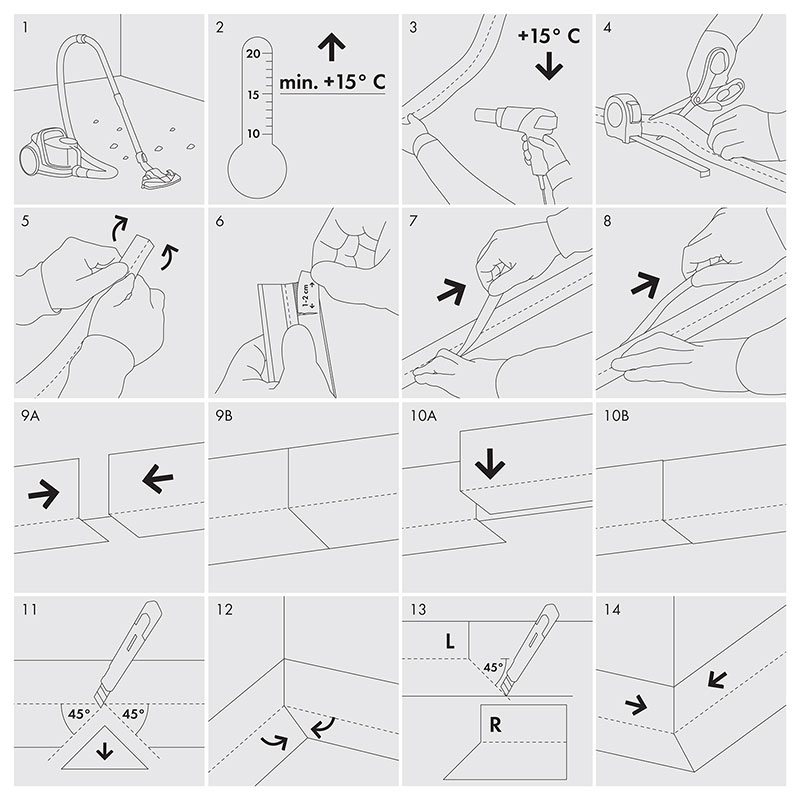
The following describes typical use as a wall and floor skirting tape, but the principle is similar for other applications.
Preparation
- Ensure that wall and floor surfaces are dry, and free of debris, dust, and grease (fig. 1).
- Application temperature should be at least 15°. Warming the tape with a hairdryer, or similar hot air blower, can greatly improve adhesion and flexibility during fitting (fig. 2 and 3).
- The crease is off-centre with 24mm one side and 28mm the other. Determine which side will be used on the floor, and ensure that is consistent around the room.
Fitting Skirting Tape along a Wall
- Measure required length, and mark on the tape, before cutting with scissors or shears (fig 4). *
- Prepare the tape for a tight fit into the corners, by folding loosely open and closed at the crease along its length (fig. 5).
- The tape should be stuck to the floor first. Tear a small section of backing from the floor side of one end of the tape, this will help hold it steady once positioned (fig. 6).
- Working from the stuck end, peel the floor backing from the tape as you press firmly down and into the corner along the length (fig. 7).
- Having stuck the floor side, repeat the same process along the wall side (fig. 8).
- When joining tape along a wall, you have the option of either butting together end to end (fig. 9a and 9b), or overlapping (fig. 10a and 10b).
Fitting to Internal Corner
- Skirting tape fits neatly into internal corners, but the floor section will need to be trimmed to stop it folding back on itself.
- Mark a point on the tape where the fold line crosses the corner, and cut a triangle from the floor side at 45° outwards on each side of the point (fig 11).
- This gap will close as the tape folds inwards at the corner, to leave a neat finish (fig. 12).
Fitting to External Corner
- Neat external corners can be achieved by using separate pieces of skirting tape that meet at the corner, but these pieces will need a special cut.
- Mark a point on the tape for the left section, where the fold-line crosses the corner, and cut vertically upwards. Then, from the same mark, cut outwards at 45°, so that the floor side extends outwards as a triangle. Repeat a mirrored process for the right section (fig.13).
- Once the tape is applied to the wall and floor, cut edges should butt up against each other, leaving a tidy finish (fig. 140).
* When measuring to an external corner, be sure to consider the extended angled cut that is required (refer to Fitting to External Corners).

Do remember that the cleaner the surface, the neater and more secure the fit. Consider also that warming the tape is advised, and that some situations may benefit from additional adhesive.
To purchase, visit: https://www.trulypvc.com/products/cezar-flexible-skirting-tape.